10 Best Yoga Poses for Effective Weight Loss: A Beginner's Guide
Have you ever thought about trying yoga to help with weight loss? Yoga is a great way to get moving and help you feel more peaceful and less stressed. When we're less stressed we're less likely to snack when we're not hungry which is excellent for losing weight.
This blog post will show you some easy yoga poses that are perfect for beginners who want to start losing weight. We've picked out 10 great poses that are simple to do and work well for helping shed those extra pounds.
And here's some good news: you'll find this guide on Trusted10.io. Our experts are great at choosing the best yoga poses for weight loss. They've got many tips and tricks to share making it easier for you to start your yoga journey.
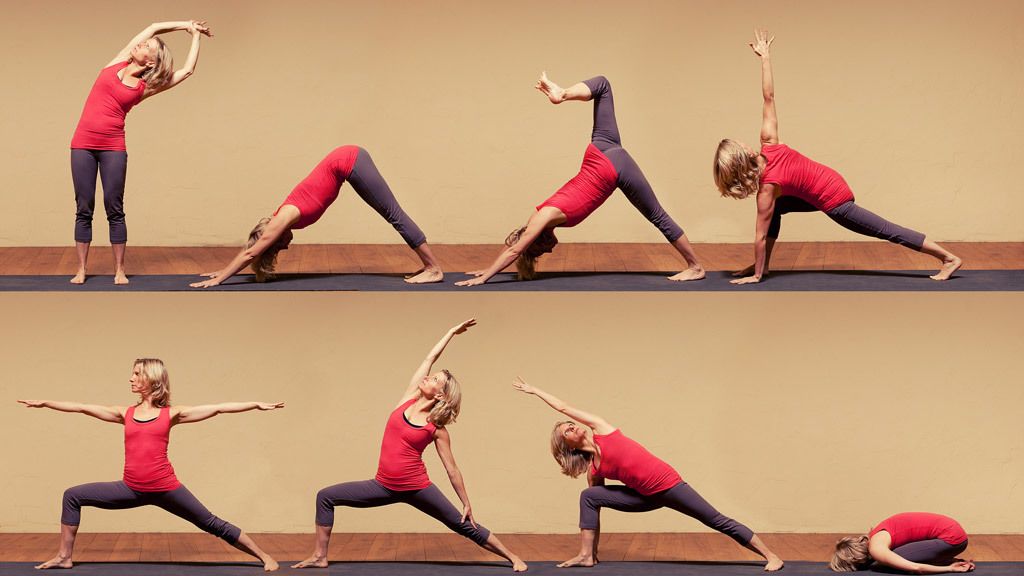
Warrior II (Virabhadrasana II)
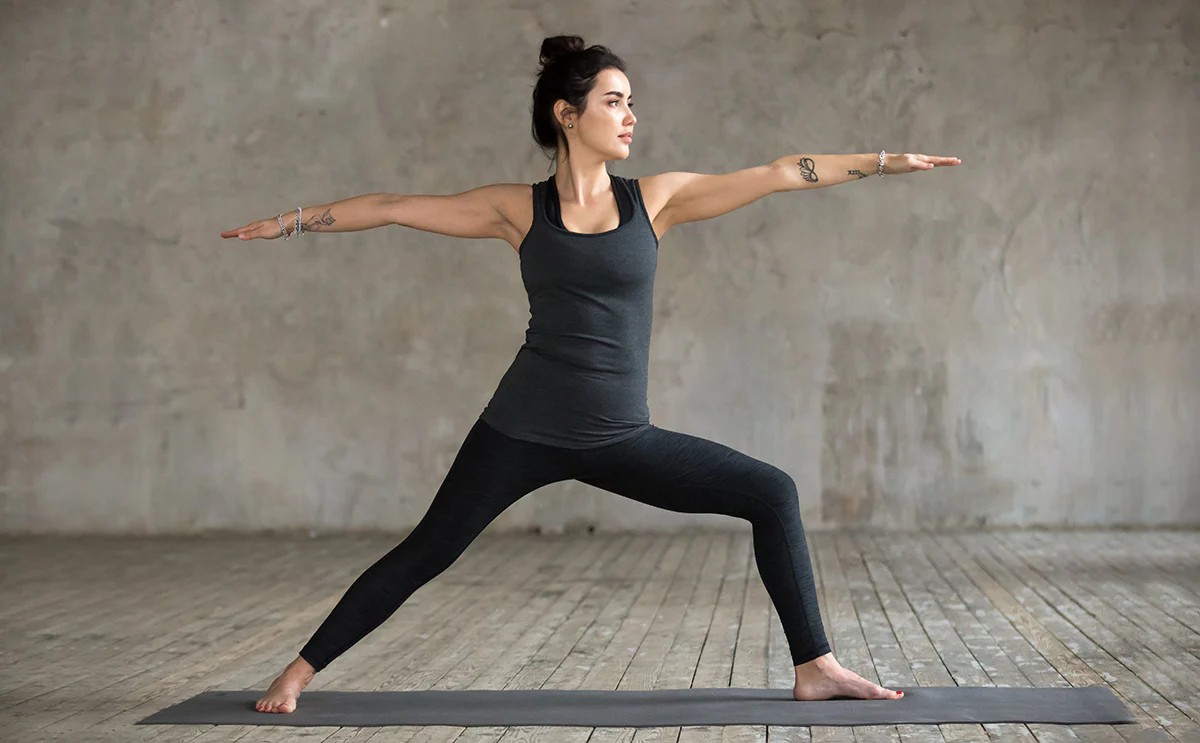
This pose is challenging but significant for those ready to try something more than just the basics. It requires balance and strength especially in your legs and hips. If you're starting with yoga this pose might take some getting used to but with practice you can get there.
Benefits:
- Improves the strength of your lower extremities.
- For the respiratory system shoulders and chest it's a great stretch.
- Helps with balance and stability.
- Good for focus and concentration.
- Increases stamina.
- It opens up the hips and chest which is good for your posture.
Step-by-Step Instructions:
- Stand with your feet apart and turn one foot out while the other foot points straight.
- To bring your thigh almost parallel to the floor bend the knee of the turned-out foot.
- Stretch your arms to each side keeping them level with your shoulders.
- Glance over your front hand as you turn your head.
- Maintain this posture for a few breaths before alternating sides.
Tips for Beginners:
- Use a block beneath your rear foot if you find it difficult to maintain your balance.
- It's okay to not bend your knee too much at first.
- To help you stand you may lean against a wall or a chair.
- Focus on feeling stable and comfortable in the pose rather than how deep you can go.
Downward-Facing Dog (Adho Mukha Svanasana)
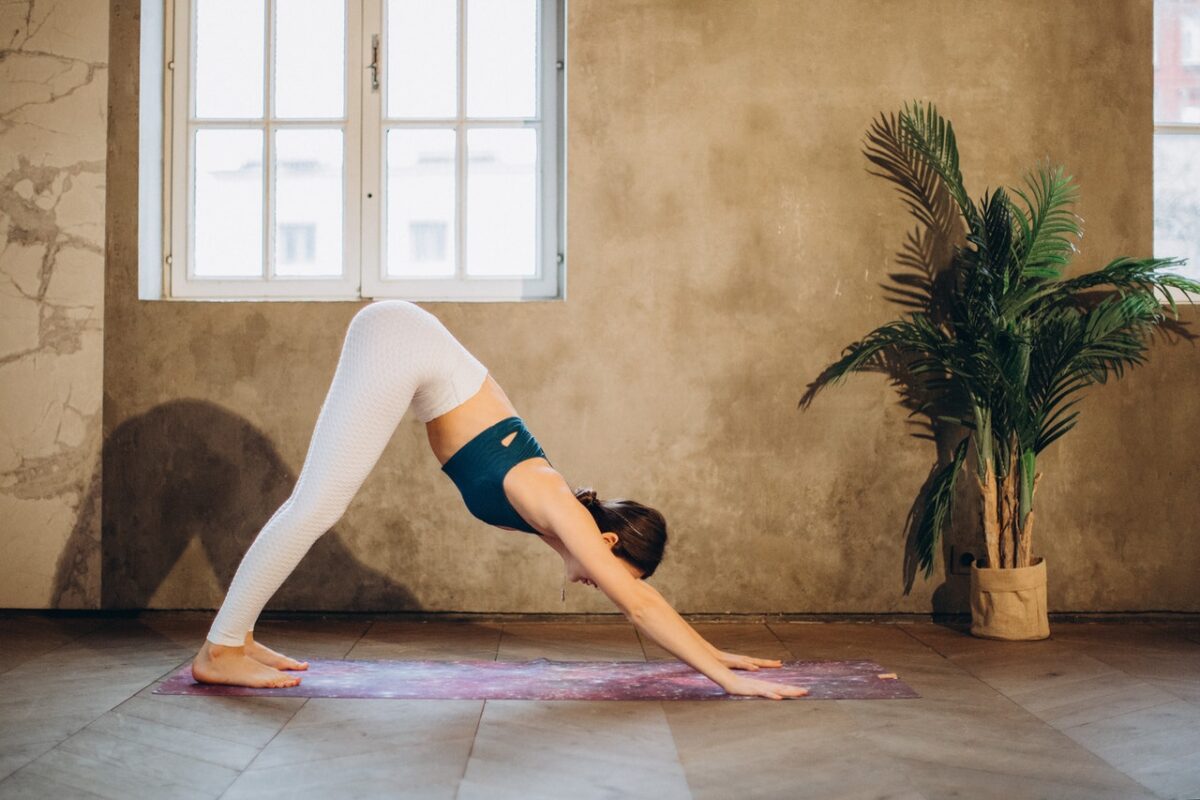
The Downward-Facing Dog or Adho Mukha Svanasana is a core pose in almost every yoga class welcoming new yogis and seasoned practitioners. This moderate pose is a blend of stretching strengthening and relaxation. While it looks straightforward the real magic of Downward Dog is in the details—the way you position your hands and feet and how you engage your muscles. It's a pose that grows with you becoming more comfortable and beneficial as you focus on your alignment and the engagement of your muscles.
Benefits
- Spine Strength and Length: It gives your back a nice long stretch helping your spine feel strong and flexible.
- Flexibility Boost: Opens up your shoulders hamstrings calves and the arches of your feet making your body more supple.
- Better Circulation: It gets the blood flowing better all through your body which is always good.
- Stress Buster: As a result you'll feel less tension in your shoulders neck and back.
- Upper Body Builder: Works on your arms and shoulders making them stronger and more toned.
- Mind Soother: It's also great for calming your mind easing stress and helping to keep worries at bay.
Step-by-Step Instructions
- Come to a crouching position with your hands just under your shoulders and knees bent over your hips.
- While tucking your toes under push down firmly with stretched fingers.
- To form an inverted V shape with your body raise your hips and push back.
- Work on bringing your chest closer to your thighs while your heels reach down towards the mat.
- Activate your core to support your back and keep your spine long and strong.
- Stay in this pose for 5–10 breaths concentrating on your breathing and keeping everything aligned.
Modifications for Beginners
- If your hamstrings are tight keeping a slight bend in your knees is okay.
- If your wrists feel the strain try placing a folded blanket under your hands for cushioning.
- Keep a tiny bend in your elbows to avoid any unnecessary pressure.
- If balancing is tricky use a wall for extra support.
Remember the goal is to feel good in the pose so adjust until you find a position that lets you breathe deeply and comfortably.
There is a good reason why the downward-facing dog is one of the most basic yoga poses: it has several advantages. It adapts to your yoga journey providing a mix of challenge and relief as you deepen your practice.
Plank Pose (Kumbhakasana)
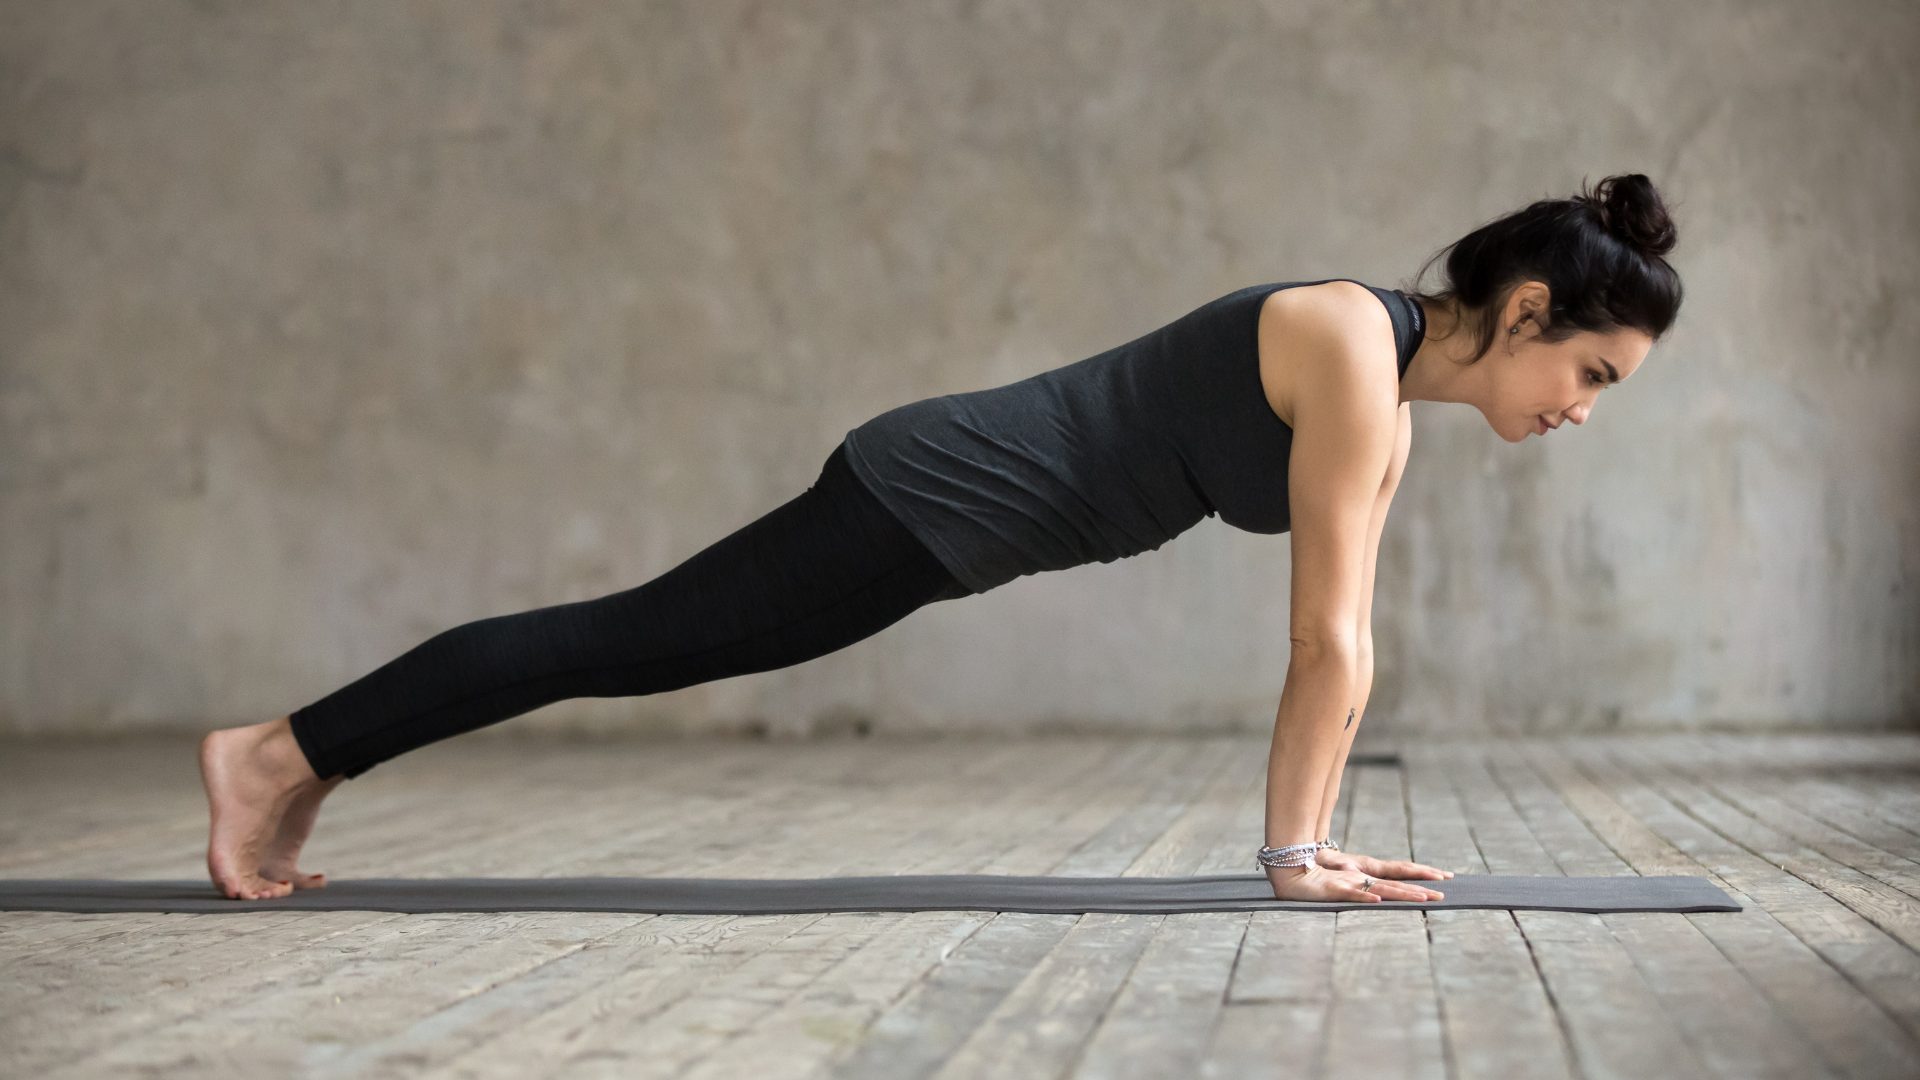
Plank Pose or Kumbhakasana is like a trusty friend in the yoga world — it's there for everyone from beginners to advanced yogis. This moderate pose is about building your inner strength focusing on your core arms and legs. It might initially feel tricky especially holding it steady but that's where the magic happens. With a bit of daily practice you'll find your strength and stamina soaring making this pose an empowering part of your routine.
Good Things About Plank Pose:
- Makes Your Middle Strong: It's perfect for your tummy muscles strengthening your core.
- Helps Your Arms and Shoulders: Your arms and shoulders will also get stronger which is great for lifting things and staying strong.
- Keeps You Standing Tall: You may find that you stand up straighter and have better posture after using it.
- Builds Up Your Staying Power: The more you do it the longer you'll be able to hold it which is excellent for building your strength.
- Gets You Ready for More: For those who want to tackle more advanced positions in due course this is an excellent place to begin.
- Part of a Bigger Routine: It's often used in a series of poses that flow together helping your whole body feel good.
How to Do It:
- Get into a crawling position by putting your hands under your shoulders and legs together.
- Keep your back straight by extending your legs behind you and pressing your palms onto the floor.
- Adjust your belly button as if you were attempting to button a snug pair of trousers.
- Ensure your shoulders are above your hands and keep your body straight.
- Try to hold this while you take 5 slow breaths. With time you can hold it longer.
Making It Easier:
- To ease the strain of keeping your whole body upright try lowering yourself to the floor on your knees. It still works your muscles but is a bit easier.
- If your hands or wrists hurt try folding a towel under them for some cushioning.
- If it hurts to lock your elbows out straight keep them slightly bent.
- Let's start by holding the pose for a short time. Attempt for greater durations as your strength increases.
Strengthening several muscle groups is a breeze with the plank pose. Although it may be difficult at first you will find that the effort is well worth it once you experience the powerful and positive effects it has on your body.
Boat Pose (Navasana)
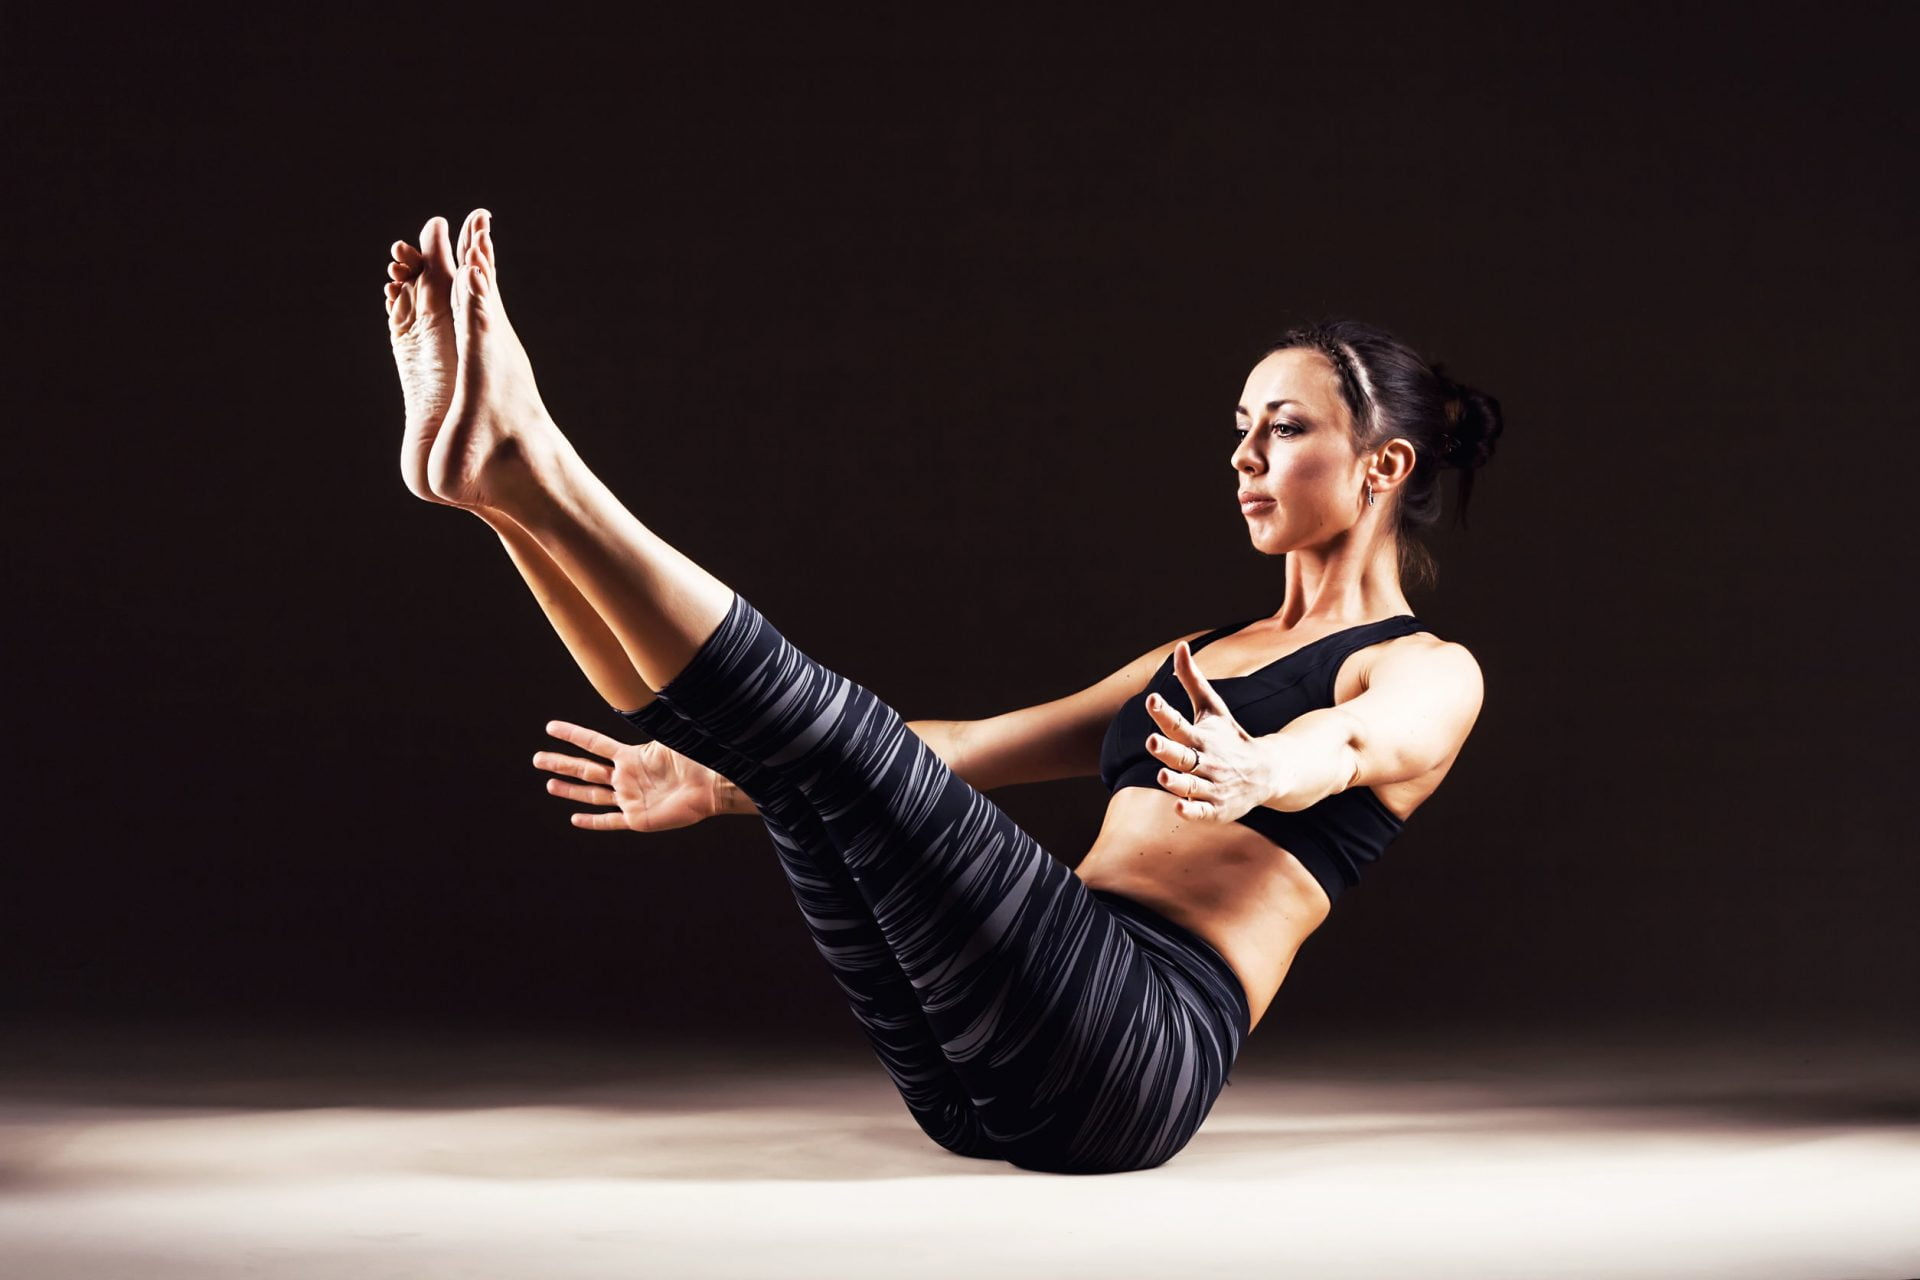
Boat Pose or Navasana is like sitting in a boat made of your own body! It's challenging because it asks you to balance and stay strong through your belly back and hips. It’s recommended to do this yoga for belly fat loss. If you're new to this you might find it a bit tricky at first. But don't worry—with some practice you'll get the hang of it. Concentrate on strengthening your core and establishing a stable balance.
Benefits
- Super Core Strength: This works out your tummy muscles strengthening and toning them.
- Happy Tummy: This can help your digestion which is excellent for your stomach.
- Strong Back and Hips: This strengthens your lower back and hip muscles keeping you strong and balanced.
- Better Balance: It helps you get better at balancing which is handy in many daily activities.
- Leg Workout: Even your legs work well in this pose.
- Sharpens Your Focus: It's also great for helping you concentrate and stay focused.
Step-by-Step Instructions
- Lay down on your yoga mat and extend your legs wide.
- Relax a little and focus on maintaining a strong and straight back.
- Lift your legs trying to make a 'V' shape with your body. Imagine you're at the bottom of a boat.
- You can keep your arms on the floor beside you for balance or stretch them out for more challenge.
- Keep your breathing nice and steady while holding this boat shape.
- If you can maintain this position for a few breaths try holding it for a bit longer with each attempt.
Modifications for Beginners
- It's okay to bend your knees if keeping them straight is too hard at first.
- Staying balanced is also made easier if you place your hands on the mat behind you.
- Use a yoga strap around your feet for support if keeping your legs up is difficult.
- Always focus on engaging your core muscles and moving at your own speed; these are the most crucial aspects.
One of the best ways to develop core strength and balance is to do the boat pose. It might take some time to feel comfortable in the pose but you'll get more robust and stable each time you practice.
Bow Pose (Dhanurasana)
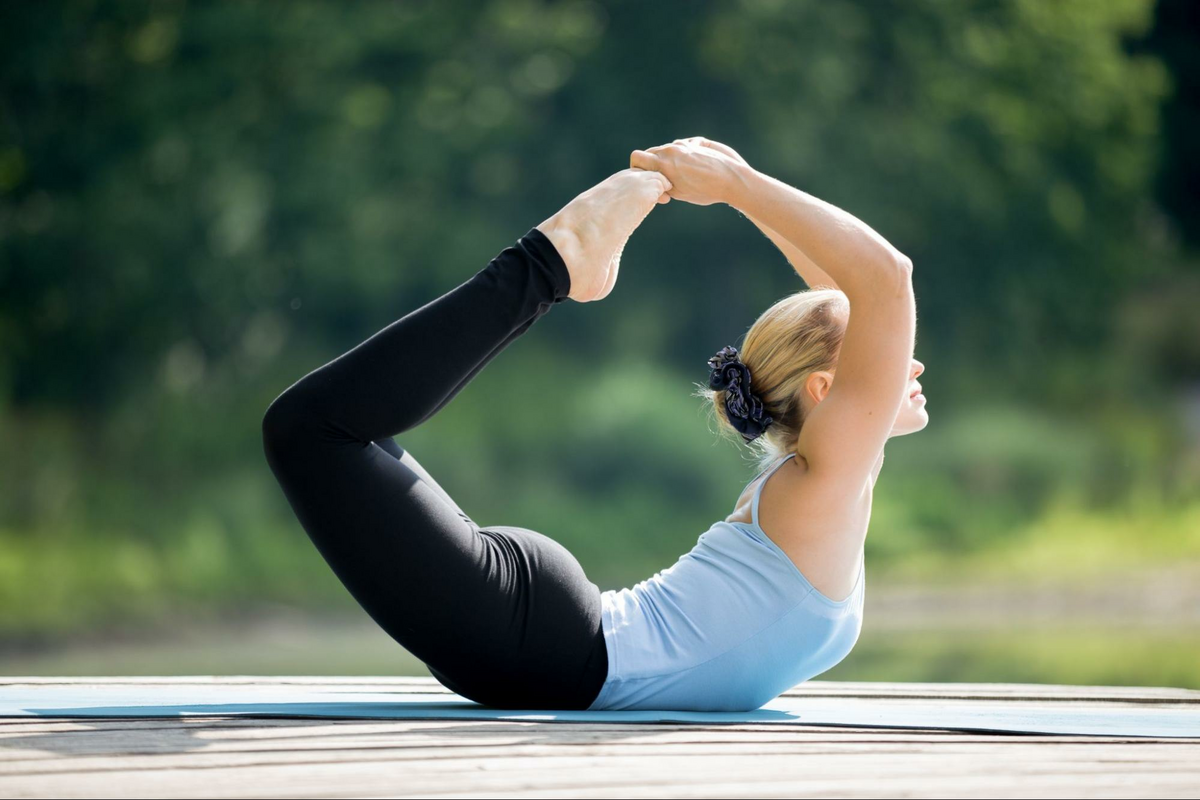
Bow Pose or Dhanurasana is like turning yourself into a bow with your body as the bow's frame and your arms as the string. This pose is a step-up because it involves a deep stretch along the front of your body and a strong lift from your back. Be careful not to strain your back or shoulders by rushing into this bend. If you're starting there are ways to ease into it building up your flexibility and strength over time.
Benefits
- Front Body Stretch: This stretch opens up the front of your body including your belly chest and thighs which can feel really good.
- Back Strengthener: It helps strengthen and support your back muscles especially those along your spine.
- Better Posture: This pose opens up your shoulders and chest helping improve your standing and sitting posture.
- Digestive Boost: This can help your digestion by massaging your belly organs as you bend.
- Spine Flexibility: It makes your spine more flexible helping you move more freely.
- Energizes and Relieves Stress: Gives you energy and helps shake off stress or tiredness.
Step-by-Step Instructions
- Start by lying down on your belly arms relaxed by your sides.
- To do this bend at the knees and grab onto your feet or ankles with your backhand.
- Take a deep breath in and as you do lift your chest and legs off the floor like you're trying to make a big arc with your body.
- Look straight ahead and keep lifting through your legs feeling a good stretch across your chest and belly.
- Squeeze your belly muscles to keep your lower back safe and to help you stay balanced.
- Hold this pose for a little while take deep breaths and then gently return to rest.
Modifications for Beginners
- If doing the full pose is too much try lifting just one leg at a time keeping the other leg relaxed on the floor.
- If grabbing your ankles is tricky you can loop a strap around your feet to extend your reach.
- Keeping your knees closer together makes it easier to lift.
- Lying on your belly may be made more comfortable by placing a folded blanket beneath your hips.
- Dwell on experiencing a pleasant opening and stretch in your chest and do not be concerned if you are unable to lift very much. It's all about gently increasing your flexibility and strength.
Bow Pose is a beautiful way to stretch and strengthen your body but it's essential to listen to your feelings and not push too hard. With practice you'll find more ease and height in the pose just like a bow ready to release its arrow.
Cobra Pose (Bhujangasana)
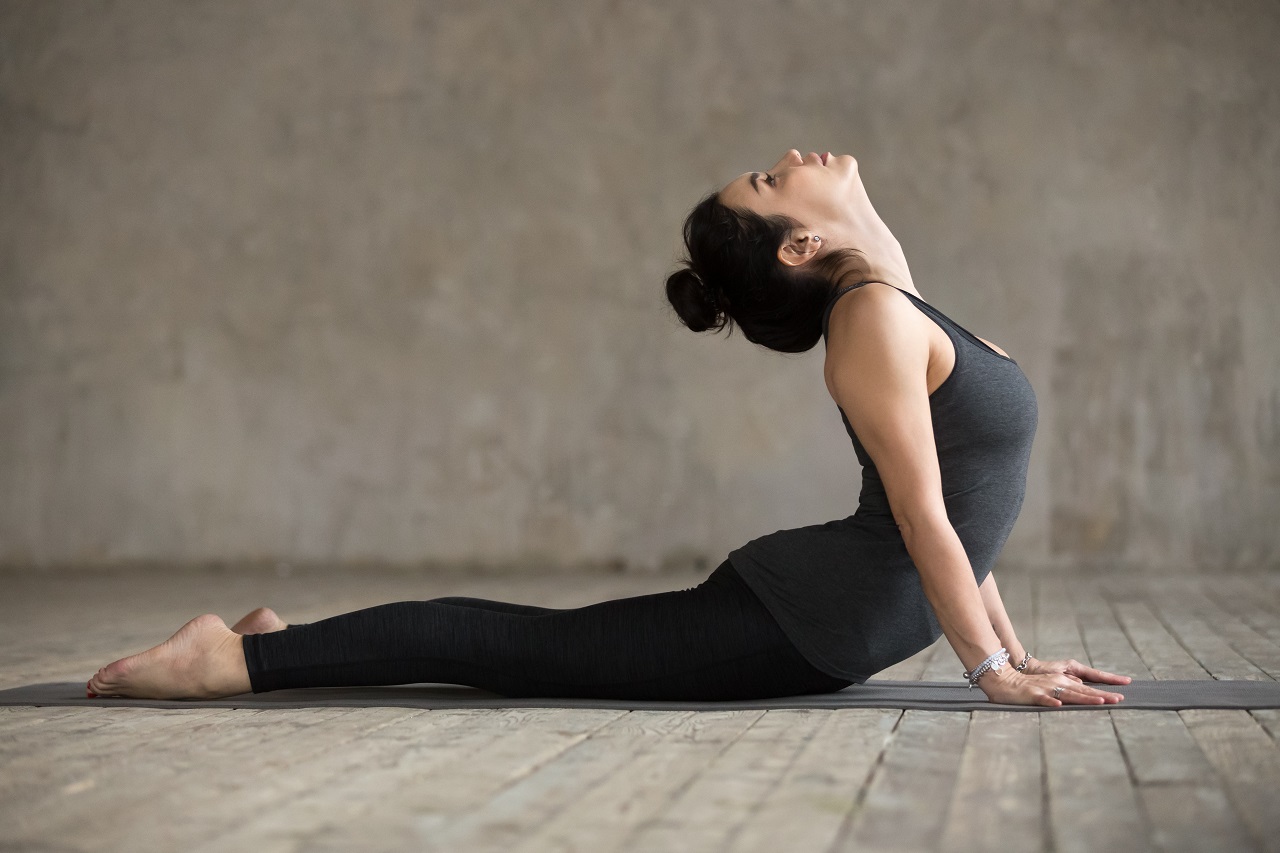
Cobra Pose or Bhujangasana is like a welcoming door to the world of backbends for those new to yoga. The pose invites your chest to open wide and your back to gently strengthen. Because it's a mild backbend it's a good starting point for beginners to get comfortable stretching the front of the body while giving the back a lovely supportive boost. The key to successfully incorporating backbends into your practice is to strike a balance between strengthening and stretching.
Benefits
- Back Muscle Builder: Improves your posture by strengthening the muscles that run the length of your spine.
- Chest and Shoulder Opener: Gently stretch your chest and shoulders making it easier to take deep breaths.
- Spine Flexibility: It encourages your spine to become more flexible helping with movement and comfort.
- Stress Reliever: Can help melt away stress and bring a sense of calm.
- Digestive Helper: Gives your belly organs a gentle nudge aiding digestion.
- Emotional Lift: This opens up the heart area which can uplift your mood and emotions.
Step-by-Step Instructions
- Before you do anything else go down on all fours and put your hands under your shoulders.
- To activate your legs firmly press the balls of your feet against the mat.
- Lift your chest slightly off the mat as you inhale making sure your lower ribs remain contacting the ground.
- Relax your neck and bring your shoulders back while opening your chest.
- Use the strength of your back to find a comfortable lift avoiding any strain.
- Hold a few deep breaths soaking in the stretch and then gently lower yourself back down as you exhale.
Modifications for Beginners
- Keeping your elbows slightly bent and hugged to your sides can make the pose feel more secure.
- If lifting is challenging you can position your hands ahead to ease the intensity.
- Think about lengthening and opening up rather than focusing on how high you can lift.
- Only lift as much as your back allows without discomfort; there's no need to push into pain.
- Remember to breathe and let each breath guide you a little deeper into the pose or help you maintain it comfortably.
Cobra Pose is a gentle invitation to explore backbends. It offers a blend of strengthening and stretching that's accessible and beneficial for most beginners. The pose encourages you to open up not just physically but also emotionally inviting a sense of release and rejuvenation with each breath.
Locust Pose (Salabhasana)
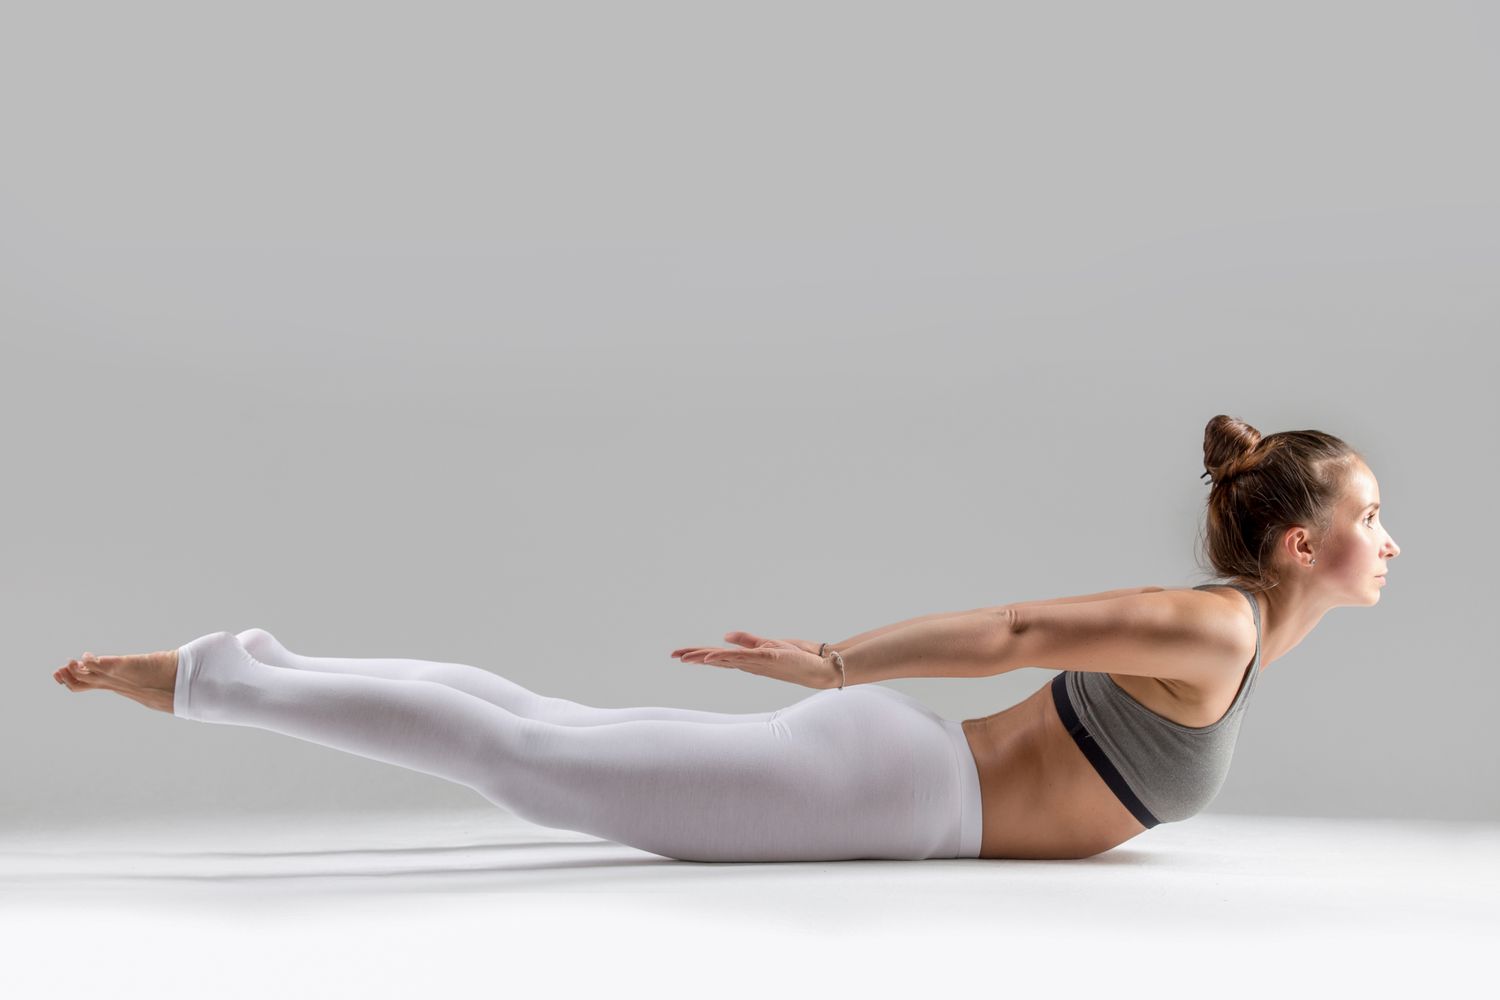
Locust Pose also known as Salabhasana presents a moderate challenge calling upon the strength of your back buttocks and thighs. It's a pose that encourages your body to lift against gravity requiring a lot of core strength and determination. While beginners might find Salabhasana demanding at first it's a pose that grows with you allowing you to enhance your strength and flexibility gradually through regular practice.
Benefits
- Back Strengthener: This product specifically targets and fortifies the muscles along your spine.
- Glutes and Hamstrings Toner: Works on firming up your buttocks and the back of your legs.
- Posture Improver: Aids develop a more muscular back contributing to better posture.
- Digestive Helper: Stimulates the organs in your belly supporting better digestion.
- Flexibility Enhancer: It increases the suppleness of your spine and shoulders.
- Concentration Booster: Helps in sharpening your focus and body awareness.
Step-by-Step Instructions
- Lay on your stomach with your arms at your sides and your palms facing up. This is the starting position.
- As you breathe in gently lift your head chest arms and legs up from the mat simultaneously.
- Direct your gaze slightly forward to keep your neck comfortable and engage your abdominal muscles for support.
- Aim to raise your legs as high as possible but ensure you're still comfortable and your spine feels long and extended.
- Press down through your hips to protect your lower back and avoid putting unnecessary pressure on it.
- Hold this lifted position for a few breaths feeling the strength in your back and legs then carefully lower back down as you breathe.
Modifications for Beginners
- If lifting both legs at once is too challenging try raising them one at a time to gradually build your strength.
- Placing your hands under your thighs can offer extra support if needed.
- Remember the lift comes from your back muscles so there's no need to overdo it with your arms. Let your back do the work.
- To enhance your comfort and alignment in the pose try placing a folded blanket under your hips.
- Never overdo it; instead pay attention to your body's signals. Gradually elevating the pose's difficulty without straining yourself is the goal.
Locust Pose is a fantastic way to build strength and flexibility that support all your daily activities and other yoga practices. Finding your sweet spot between easy and challenging is key to become stronger and more competent over time.
Bridge Pose (Setu Bandha Sarvangasana)
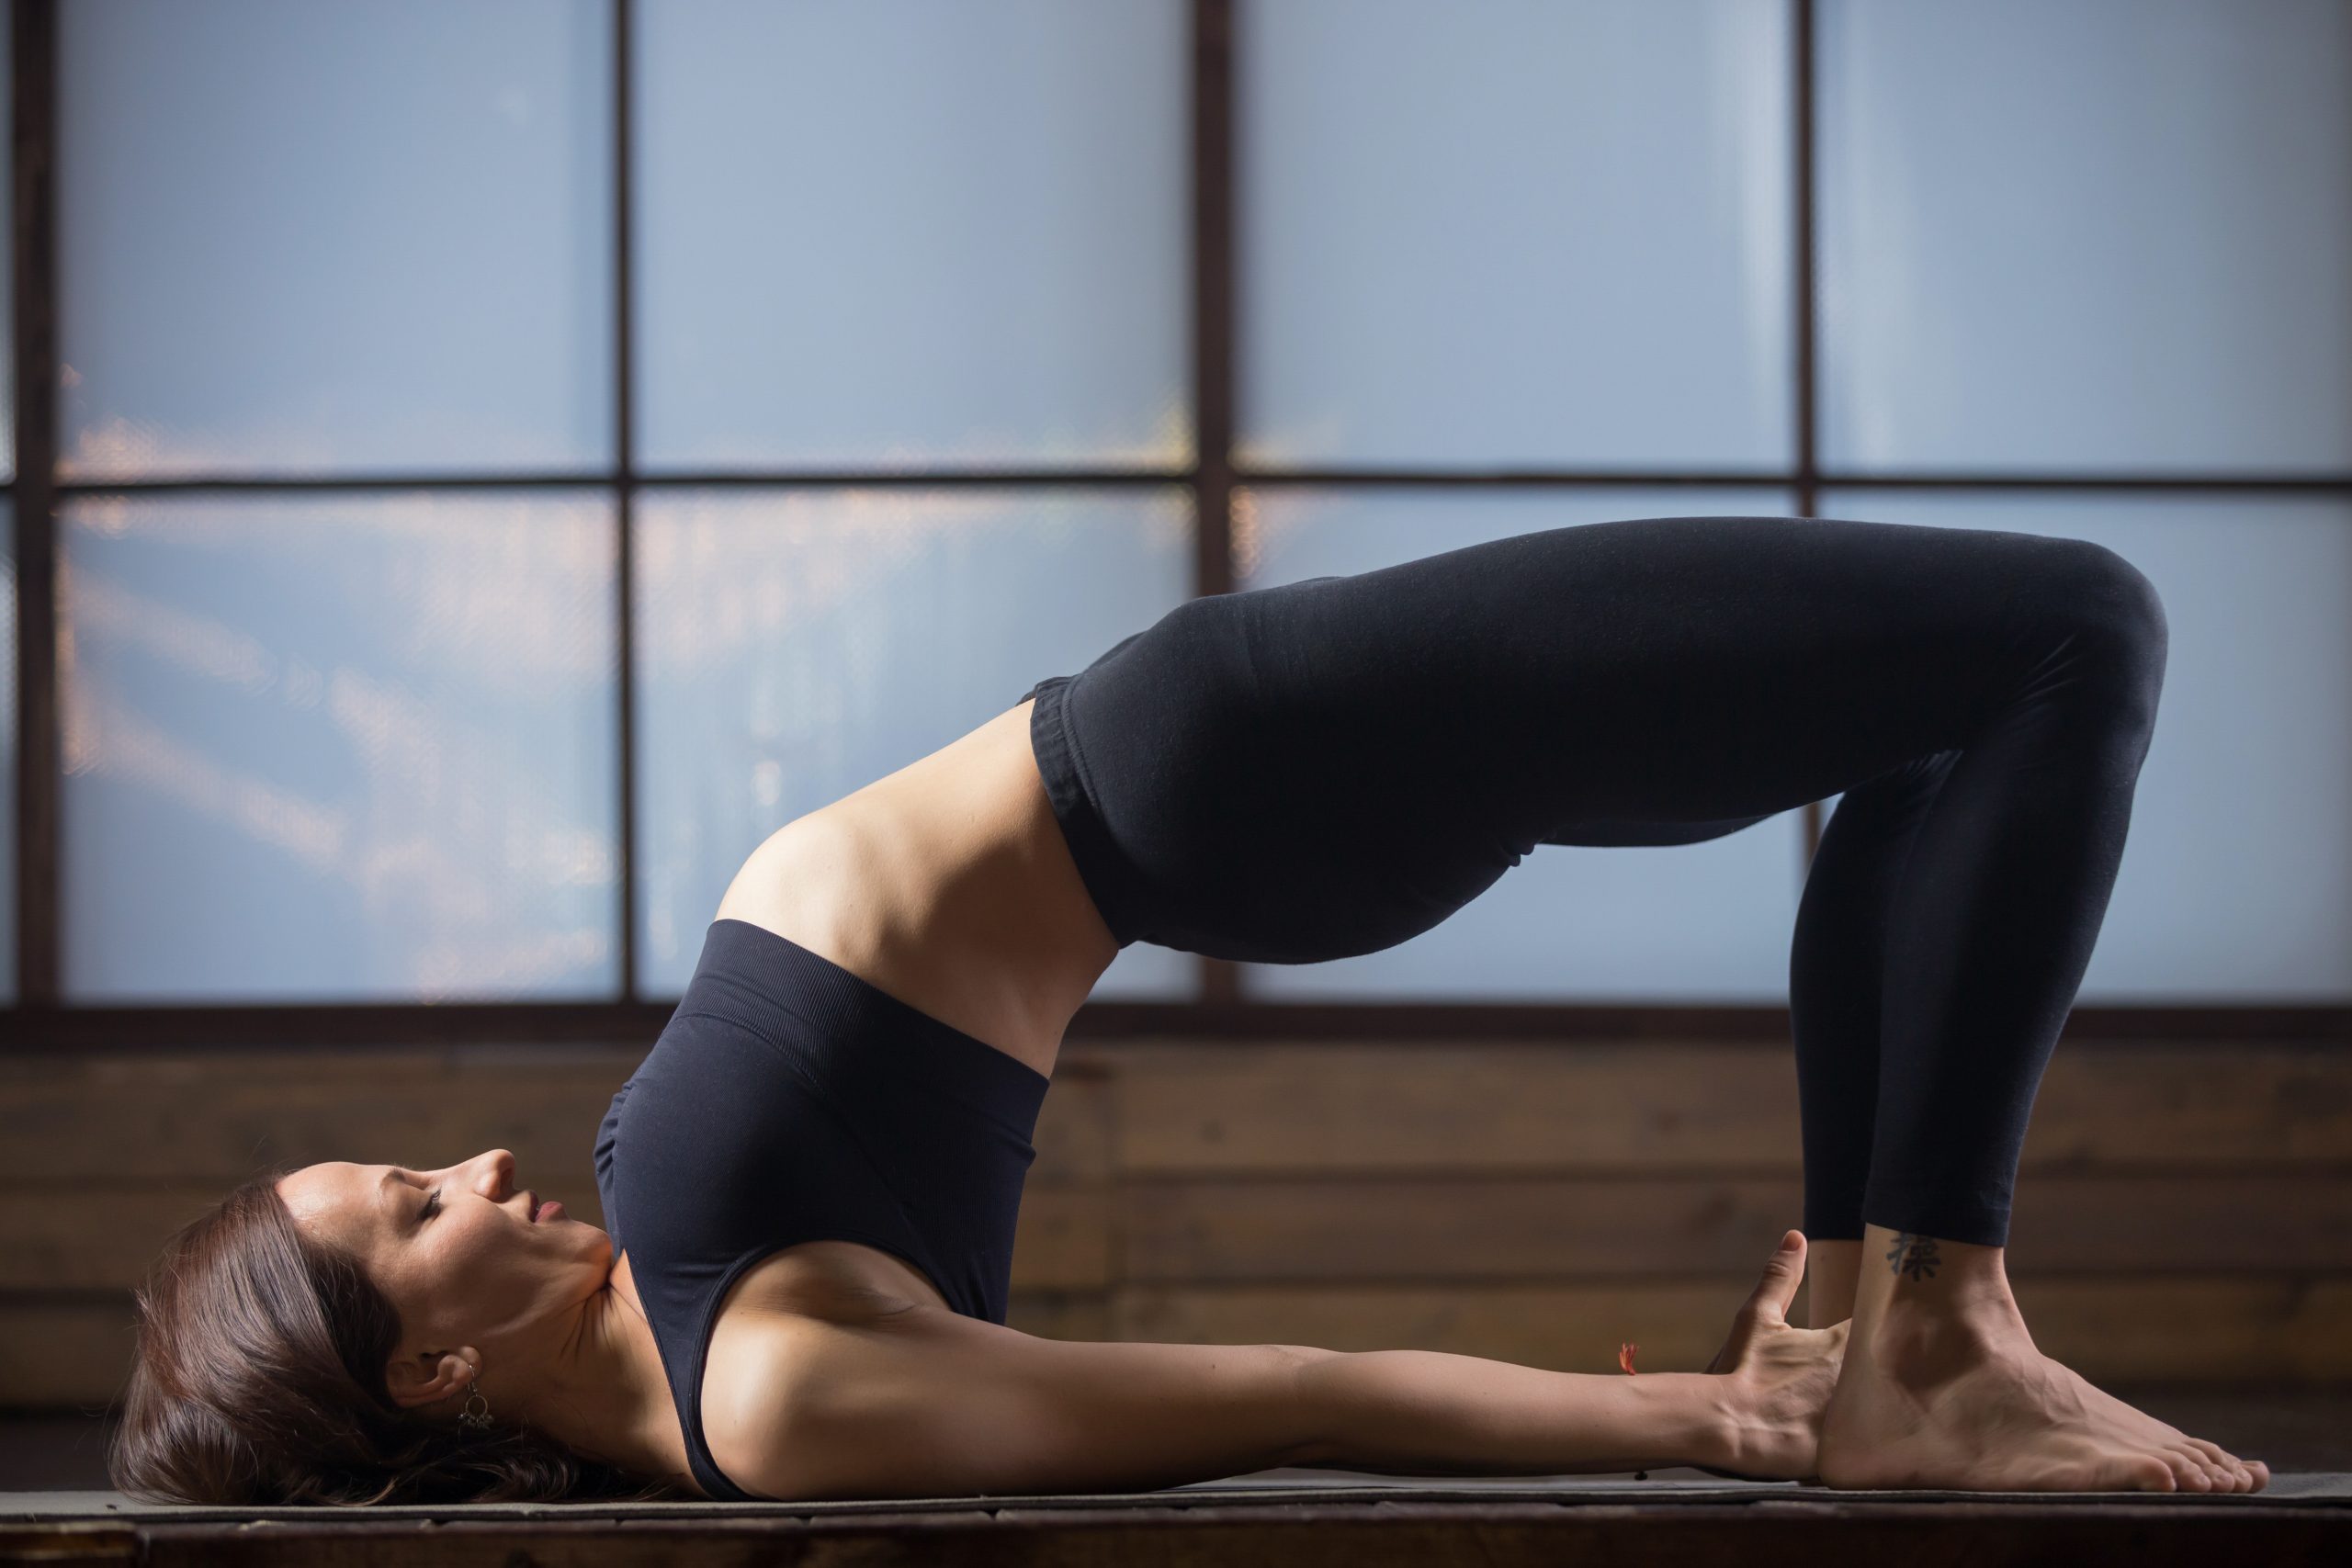
Bridge Pose or Setu Bandha Sarvangasana is a welcoming pose for beginners offering a gentle introduction to backbends. It's all about lifting and opening — your chest your spine and even your heart. This pose doesn't require much flexibility or strength but as you press into your feet and lift your hips you'll feel a superb stretch along your front body and a strengthening in your back.
Benefits
- Back Muscle Booster: Great for giving your back muscles a good strengthening workout.
- Spine Stretcher: Helps in stretching out your spine neck and chest making you feel more flexible.
- Posture Polisher: This tool opens up your shoulders and chest which can help with your posture.
- Digestive Delight: It moves those abdominal organs which is excellent for digestion.
- Soothes Backaches: This can relieve mild back pain and general tiredness.
- Stress Buster: It helps calm your mind easing stress and anxiety and bringing peace.
Step-by-Step Instructions
- Roll onto your back bend at the knees place your flat feet on the floor near your buttocks and keep your arms at your sides.
- To make it seem like you're reaching for the sky press down on your heels to elevate your hips.
- If you can clasp your hands together underneath your back and try to wiggle your shoulders closer together.
- Try to squeeze everything in toward your midline while keeping your legs parallel to the ground.
- Stretch your knees away from you towards the end of your mat while lifting your chest a bit towards your chin.
Stay in this lifted bridge for a few breaths feeling the stretch and strength building in your body then gently lower yourself down to the mat one piece of your spine at a time.
Modifications for Beginners
- If holding the full pose is a bit much you can place a yoga block under your lower back (sacrum) for support. This lets you feel the opening without having to work so hard.
- To alleviate pressure on your shoulders maintain a tiny bend in your elbows.
- Using a yoga strap around your thighs can help keep them from falling outward helping you maintain good alignment.
- Press down evenly through both feet to keep the lift balanced and avoid putting too much pressure on one side.
- Keep your neck and face relaxed and focus on breathing into your chest to deepen the opening in your bridge pose.
- Bridge Pose is a gentle and effective way to introduce backbends into your practice helping to build foundational strength and flexibility while offering a moment of calm and introspection.
Child's Pose (Balasana)

Child's Pose or Balasana is a mini-retreat for your body and mind. It's one of those poses perfect for everyone whether you're just starting with yoga or have been practicing for years. It doesn't ask for much just for you to fold forward and let go. It's a gentle stretch that can be held comfortably allowing you to melt away any tension you're carrying.
Benefits
- Gentle Stretch: Offers a lovely stretch through your hips thighs and ankles.
- Tension Release: Great for easing tightness in your back shoulders and neck.
- Mind Calmer: Helps quiet down busy thoughts reducing stress and anxiety.
- Digestive Aid: Gently massage your belly which can help with digestion.
- Awareness Enhancer: Improves your health by getting you in touch with your body.
- Transition Pose: A nice easy pose to prepare your body for more challenging stretches.
Step-by-Step Instructions
- Start by kneeling on your yoga mat toes together with your knees as wide as feels good.
- While extending your arms forward bring your chest down toward the floor.
- As you let your spine relax place your forehead softly on the mat.
- Sink your hips back towards your heels feeling a nice stretch in your hips and back.
- Your arms might be at your sides or extended in front of you.
- Take deep soothing breaths staying in the pose for as long as it feels good letting your body and mind unwind.
Modifications for Beginners
- A folded blanket might provide additional cushioning if you're having trouble sitting back on your heels.
- If your forehead doesn't comfortably reach the mat a bolster or a block can bring the ground up to meet you.
- If your hips feel tight try widening your knees to give yourself extra space.
- Pay attention to your breathing; with each in and out breath allow yourself to let go of a little more stress.
- A lovely approach to calm down and center oneself is in Child's Pose.f It invites relaxation and reflection allowing you to reconnect with your breath and find a moment of peace in your practice.
Corpse Pose (Savasana)
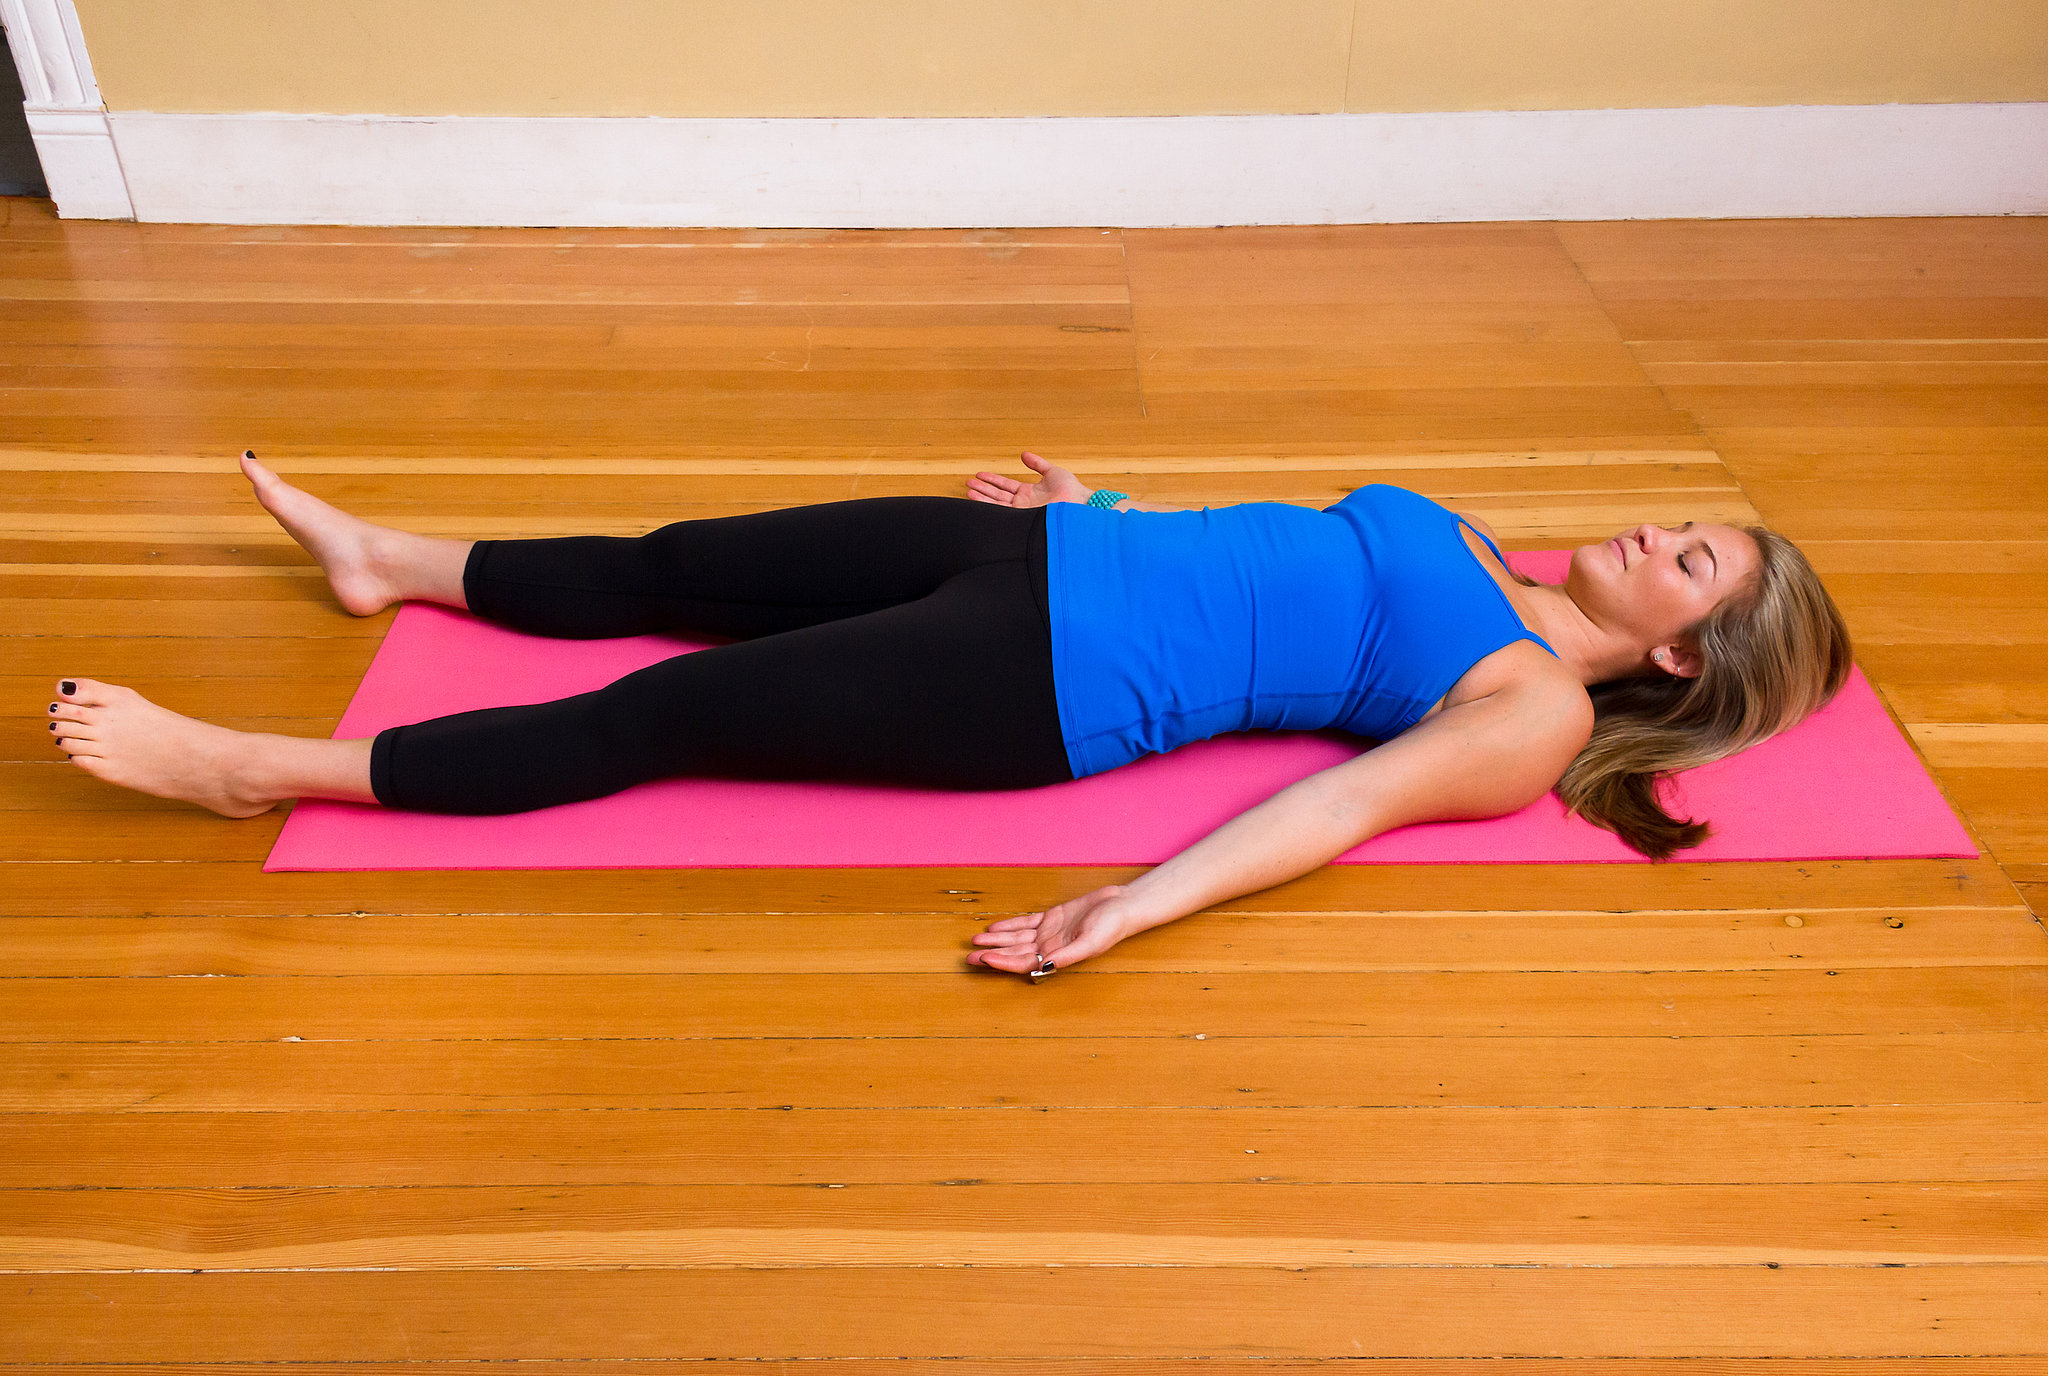
Corpse Pose or Savasana is unique because it looks like you're just lying down and resting but there's a lot more under the surface. It's a pose that invites you to completely let go physically and mentally which can be surprisingly challenging. While anyone can lie down genuinely relaxing and quieting the mind takes practice and patience. It's a crucial part of yoga allowing your body and mind to absorb and integrate all the benefits of your training.
Benefits
- Deep Relaxation: It helps your whole body relax releasing stress and tension.
- Calms Your System: Good for your heart and nerves helping you feel calm and steady.
- Mindfulness Boost: Developing a keener sense of self-awareness might help you live in the here and now.
- Sharper Focus: You could find that you're able to concentrate better and feel more awake thereafter if you do this.
- Sleep Helper: If you're having problems falling or staying asleep try practicing Savasana.
- Yoga Integration: This gives you a chance to soak in all your excellent work during your yoga session.
Step-by-Step Instructions
- Lie comfortably on your back letting your legs and arms relax fully with your palms facing upwards.
- Relax and allow your body sink into the earth as you slowly close your eyes.
- Begin to notice and then release any tension you might be holding from the tips of your toes to the top of your head.
- Take slow deep breaths paying attention to your breathing pattern and how you feel as you let go with each exhale.
- Feel free to let your thoughts roam if you so want. Raise your awareness slowly to the sensation of relaxation and your breathing.
- Stay in this peaceful state for 5–10 minutes or even longer. When you're ready to get out do it slowly by moving your toes and fingers around and rolling to one side before sitting down.
Modifications for Beginners
- If your lower back hurts put a pillow or a blanket that has been rolled up under your knees.
- Feel free to cover yourself with a blanket if you tend to get cold or to help you feel more secure and relaxed.
- An eye pillow or a soft cloth over your eyes can help block out light and distractions deepening your relaxation.
- If you find it hard to quiet your mind consider using a guided relaxation recording or focusing on a peaceful image or memory.
- Find the hand and arm position that feels most restful for you. Some people like to let their arms rest a little away from their bodies palms up while others prefer them closer.
Savasana is more than just a nap; it's a conscious intentional process of relaxation that rejuvenates your body mind and spirit. Take advantage of this important time to get to know yourself better and find peace and calm in the quiet.
Conclusion
We discussed some excellent beginner yoga for weight loss that can help you feel stronger and more relaxed and they can even help you lose weight. From the strong Warrior II to the calming Child's Pose each has its own unique way of helping your body. Don't worry if you need to take it easy or change the poses to fit your needs.
Yoga is a great adventure no matter where you are in your journey to get fit or lose weight. It's not just about moving your body; it's also about taking a little time to breathe and feel good. Then why not give it a shot? It may be fun for you!
And if you're looking for more fun yoga ideas or tips on staying healthy Trusted10.io has got you covered. We're like friends always there with helpful tips or kind words helping you learn and grow in your yoga practice. So go ahead and explore what they have to offer. Who knows what new things you'll discover?